
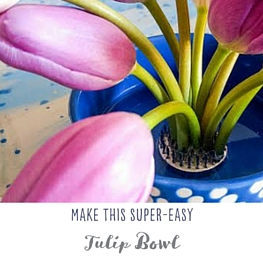
I love tulips, don’t you? They look so fresh and happy.

Yesterday, Ada helped me make this cute, little tulip bowl and I had to share it with you. This was so cheap and easy but stinking cute. It would make a great gift! Here’s how to make your own:
I have included affiliate links for your convenience. What does this mean? If you decide to buy, I will earn a small commission off your purchase at no cost to you. That income helps me keep this blog up and running. If you’d like to learn more, here’s my full disclosure.

Small bowl
Flower arrangement holder (also called “frog”)
E-6000 glue
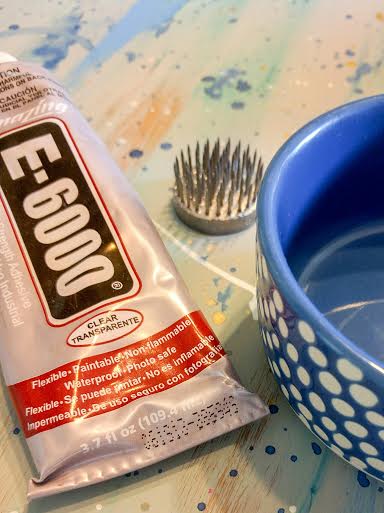

- Apply E-6000 glue to the bottom of the flower arrangement holder and carefully press it into the center of the bowl. Allow the glue to dry for a few hours.
- Cut the stems of your flowers down to about 4 inches. I find that it’s better to cut them too long and trim until you get the look you want. If the stem is too long, the flower will be floppy. Your arrangement will be neater if you trim the stems shorter.
- Add water and admire your pretty flowers! Seriously. It’s that simple!
I’ll warn you, this is a little addicting. Like I needed another reason to bring home all of the pretty, patterned bowls I’ve been seeing lately ;)
Alright…back to work for me. I’m on a mission to purge our house this week. I must simplify! I’ll be back Friday to tell you more on that subject. Let me know if you make yourself a little tulip bowl! I’d love to see what you come up with, friends.


2 Responses
Great little tutorial. My aunt has used floral ‘frog’s’ for years. Most are heavy enough to stay put in your bowl or vase, but if you really need to hold it in place, I’d suggest floral putty. That way you can re-use your ‘frog’ in all kinds of bowls and vases for years and years, so I’d skip the E-6000. And you won’t have to let it dry. So, faster than a 5-minute project.
Oh, you’re right! That would be much easier!